はじめに
SwiftUIでUISegmentedControlを作るやり方と、色やフォントの外観を変える方法の紹介です。
動作確認は Xcode 11.3.1 でしております。
Pickerを置いて、SegmentedPickerStyleを指定する
SwiftUIでUISegmentedControlを使いたい場合、Picker というコントロールを使います。
Pickerを置いたあと、pickerStyleにSegmentedPickerStyleを指定すればOK。
struct ContentView: View {

    @State private var selectedIndex = 0

    var body: some View {
        Picker("", selection: self.$selectedIndex) {
            Text("お米")
                .tag(0)
            Text("パン")
                .tag(1)
            Text("麺")
                .tag(2)
        }
        .pickerStyle(SegmentedPickerStyle())
    }
}
これだけ。
各項目(ここではText)にtagを付けるのを忘れないように注意します。
また、コンストラクタの第1引数にLabelのタイトルを指定するようになっていますが、ここを入れてもどこにも表示されない?ようなので、用途はいまいちわかっておりません。。
プレビューすると以下のように表示されるかと思います。

色やフォントの変更はUISegmentedControl.appearance()で
上のはモノクロな感じでちょっと味気ないので、色とフォントを変えてみます。
外観を変更する場合、UISegmentedControl.appearance() を使用します。
ここではContentViewにイニシャライザーを入れて、その中で設定しています。
init() {
    let font = UIFont(name: "AvenirNext-Medium", size: 16)!
    let foregroundColor = UIColor(red: 0.0, green: 0.5, blue: 0.0, alpha: 0.5)
    let backgroundColor = UIColor(white: 0.95, alpha: 0.5)

    // 選択中のセグメントの色
    UISegmentedControl.appearance().selectedSegmentTintColor = foregroundColor

    // 背景色
    UISegmentedControl.appearance().backgroundColor = backgroundColor

    // 通常時のフォントと前景色
    UISegmentedControl.appearance().setTitleTextAttributes([
        .font: font,
        .foregroundColor: foregroundColor,
    ], for: .normal)

    // 選択時のフォントと前景色
    UISegmentedControl.appearance().setTitleTextAttributes([
        .font: font,
        .foregroundColor: UIColor.white,
    ], for: .selected)
}
UISegmentedControl.appearance() 以下はそのままUISegmentedControlなので、SwiftUI以前の方法がそのまま通じるかと思います。
ただし、UISegmentedControl.appearance()による設定はUISegmentedControlのすべてのインスタンスに影響するため、他で違う設定を行っても後勝ちで合わされてしまいますので注意が必要です。
ちなみに、SwiftUIで各コントロール(UIViewやそのサブクラス)のインスタンスにアクセスする方法ってないんでしょうかね?
プレビューすると以下のように変わりました。

おまけ
ちょっと動きの確認できるものを書いてみます。
上記のコードと合わせ、全体のコードを以下のようにしました。
struct ContentView: View {

    private let stapleFoods = ["お米", "パン", "麺"]

    @State private var selectedIndex = 0

    init() {
        let font = UIFont(name: "AvenirNext-Medium", size: 16)!
        let foregroundColor = UIColor(red: 0.0, green: 0.5, blue: 0.0, alpha: 0.5)
        let backgroundColor = UIColor(white: 0.95, alpha: 0.5)

        // 選択中のセグメントの色
        UISegmentedControl.appearance().selectedSegmentTintColor = foregroundColor

        // 背景色
        UISegmentedControl.appearance().backgroundColor = backgroundColor

        // 通常時のフォントと前景色
        UISegmentedControl.appearance().setTitleTextAttributes([
            .font: font,
            .foregroundColor: foregroundColor,
        ], for: .normal)

        // 選択時のフォントと前景色
        UISegmentedControl.appearance().setTitleTextAttributes([
            .font: font,
            .foregroundColor: UIColor.white,
        ], for: .selected)
    }

    var body: some View {
        GeometryReader { geometry in
            VStack(alignment: .leading, spacing: 0) {

                Text("好きな主食は?")
                    .font(Font(UIFont(name: "AvenirNext-Medium", size: 22)!))
                    .foregroundColor(.gray)

                Spacer()
                    .frame(height: 8)

                Picker("", selection: self.$selectedIndex) {
                    ForEach(0..<self.stapleFoods.count) { index in
                        Text(self.stapleFoods[index])
                            .tag(index)
                    }
                }
                .pickerStyle(SegmentedPickerStyle())
                .frame(width: geometry.size.width * 0.7)

                Spacer()
                    .frame(height: 24)

                HStack(alignment: .center, spacing: 4) {
                    Text("やっぱ")
                    Text(self.stapleFoods[self.selectedIndex])
                        .fontWeight(.bold)
                        .foregroundColor(.red)
                    Text("でしょ!")
                }
                .font(Font(UIFont(name: "AvenirNext-Regular", size: 22)!))
                .foregroundColor(.gray)
                .frame(width: geometry.size.width * 0.7, alignment: .center)
            }
        }
    }
}
Pickerのコンテンツは実際には何かの配列を使うと思うので、ForEachに変更。
bodyの直下にGeometryReaderを挟んで、画面のサイズに合わせて幅も調整。
あとは適当に。
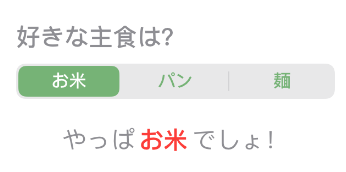
動かしてみると以下のような感じになりました。
👍
おわりに
高さの変更とか、インスタンスごとの外観変更とか、いろいろ痒いところに手が届かないのがちょっともどかしいですが、ひとまずはこれで使っていけそうです。
それでは。