はじめに
前回の記事「NSParagraphStyleで自在にレイアウト①」からの続きです。
Playgroundで動かす用の大本のサンプルソースは前回の記事にありますので、必要な方はそちらを御覧ください。
開発環境は Xcode 12.5 / Swift 5.4 です。
改行規則に関する項目
改行規則に関する項目は以下の4つになります。
- lineBreakMode
- lineBreakStrategy
- hyphenationFactor
- allowsDefaultTighteningForTruncation
lineBreakMode
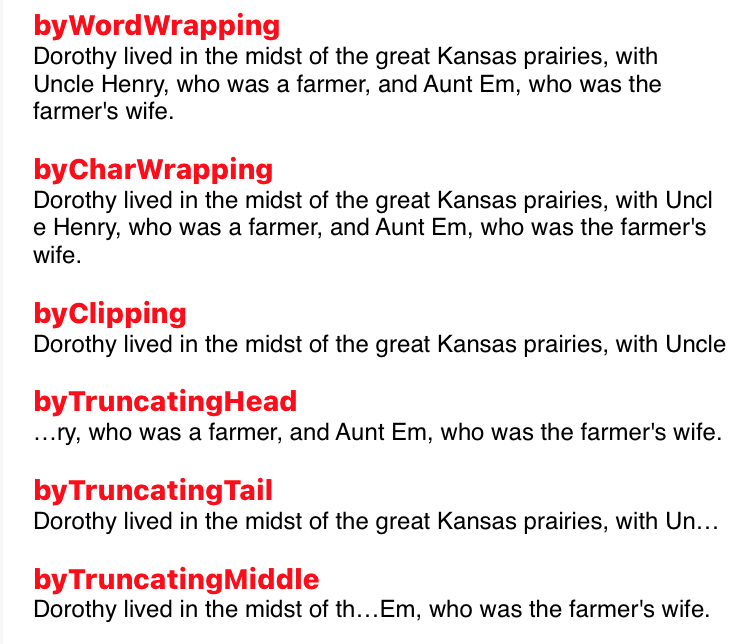
lineBreakMode は、ある行の長さが描画領域に収まらない場合に、どのように処理するかを指定します。
値としてNSLineBreakModeのいずれかを指定します。
・byWordWrapping
単語単位で改行する
・byCharWrapping
文字単位で改行する
・byClipping
先頭から収まるところまでを表示し、残りをぶつ切りにする
・byTruncatingHead
先頭に省略記号 (…) を置き、収まる末尾までを表示する
・byTruncatingTail
先頭から収まるところまでを表示し、残りを省略記号 (…) で省略する
・byTruncatingMiddle
中央に省略記号 (…) を置き、収まる先頭までと末尾までを表示する
↓サンプルコード
func testLineBreakMode() {

    let string = NSMutableAttributedString()

    [NSLineBreakMode.byWordWrapping,
     .byCharWrapping,
     .byClipping,
     .byTruncatingHead,
     .byTruncatingTail,
     .byTruncatingMiddle,
    ]
    .forEach { mode in

        let style = NSMutableParagraphStyle()
        style.lineBreakMode = mode

        string.append(NSAttributedString(string: "\(mode)\n", attributes: [
            .font: UIFont.systemFont(ofSize: 14, weight: .heavy),
            .foregroundColor: UIColor.red,
        ]))

        string.append(NSAttributedString(string: "Dorothy lived in the midst of the great Kansas prairies, with Uncle Henry, who was a farmer, and Aunt Em, who was the farmer's wife.", attributes: [
            .paragraphStyle: style
        ]))

        string.append(NSAttributedString(string: "\n\n"))
    }

    textView.attributedText = string
}
↓実行結果
lineBreakStrategy
lineBreakStrategy は、改行位置を判断する制御方法の指定を行います。
lineBreakModeが純粋に描画領域に収まらないテキストをどう処理するかというレイアウト上の問題であるのに対し、こちらは禁則処理に関する判断を加えるものとなっています。
値として、NSParagraphStyle.LineBreakStrategyのメンバーから1つないしは複数を指定します。
以下、一つずつ紹介します。
pushOut
pushOut は、段落の最終行が孤立した1つの単語だけにならないよう、各行から単語を押し出して調整を行う処理を加えます。
↓サンプルコード
func testLineBreakStrategy1() {

    let text = "Dorothy lived in the midst of the great Kansas prairies, with Uncle."

    let string = NSMutableAttributedString()

    // No pushOut
    string.append(NSAttributedString(string: "No pushOut\n", attributes: [
        .font: UIFont.systemFont(ofSize: 14, weight: .heavy),
        .foregroundColor: UIColor.red,
    ]))

    string.append(NSAttributedString(string: "\(text)\n\n"))

    // Apply pushOut
    let style = NSMutableParagraphStyle()
    style.lineBreakStrategy = .pushOut

    string.append(NSAttributedString(string: "Apply pushOut\n", attributes: [
        .font: UIFont.systemFont(ofSize: 14, weight: .heavy),
        .foregroundColor: UIColor.red,
    ]))

    string.append(NSAttributedString(string: "\(text)", attributes: [
        .paragraphStyle: style
    ]))

    textView.attributedText = string
}
↓実行結果
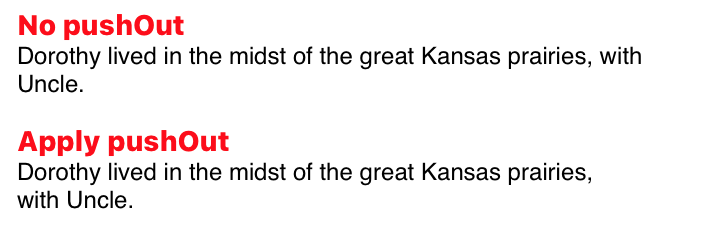
最終行が「Uncle.」だけにならないよう、”with”が押し出されて「with Uncle.」になりました。
hangulWordPriority
hangulWordPriority は、ハングルの単語の途中で区切りが入らないようにするための処理を加えます。 (iOS14以上)
韓国語では「分かち書き」と言って、スペースで単語の区切りをわかりやすくする作法があるそうですが、スペースの有無によって文の意味まで変わってしまうことがあるそうです。
例として、「운전을 못해요」と「운전을 못 해요」の2つの文はどちらも「運転ができません」という意味で、文字だけを見れば同じに感じられます。
ですが、前者が「できるにはできるけど下手くそで(運転ができません)」、後者が「免許がなくて・車がなくて(運転ができません)」というニュアンスで、スペースの有無で受け手の印象がまったく異なってしまいます。
※こちらのサイト様の記事を参考・引用 (下線部分) させていただきました🙇♂️
ぐんぐん独学韓国語 – 못하다と못 하다の違い【解説と例文】
↓サンプルコード
func testLineBreakStrategy2() {

    let hangulText1 = "운전을 못해요." // This means "I'm not good at driving."
    let hangulText2 = "운전을 못 해요." // This means "I can't drive."

    // Indent width to put a line break at behind "못"
    let indent = NSAttributedString(string: "운전을 못").size().width

    let string = NSMutableAttributedString()

    // No hangulWordPriority
    let style1 = NSMutableParagraphStyle()
    style1.tailIndent = indent

    string.append(NSAttributedString(string: "No hangulWordPriority\n", attributes: [
        .font: UIFont.systemFont(ofSize: 14, weight: .heavy),
        .foregroundColor: UIColor.red,
    ]))

    string.append(NSAttributedString(string: "\(hangulText1)\n\(hangulText2)\n\n", attributes: [
        .paragraphStyle: style1
    ]))

    // Apply hangulWordPriority
    let style2 = NSMutableParagraphStyle()
    style2.tailIndent = indent
    style2.lineBreakStrategy = .hangulWordPriority

    string.append(NSAttributedString(string: "Apply hangulWordPriority\n", attributes: [
        .font: UIFont.systemFont(ofSize: 14, weight: .heavy),
        .foregroundColor: UIColor.red,
    ]))

    string.append(NSAttributedString(string: "\(hangulText1)\n\(hangulText2)", attributes: [
        .paragraphStyle: style2
    ]))

    textView.attributedText = string
}
↓実行結果
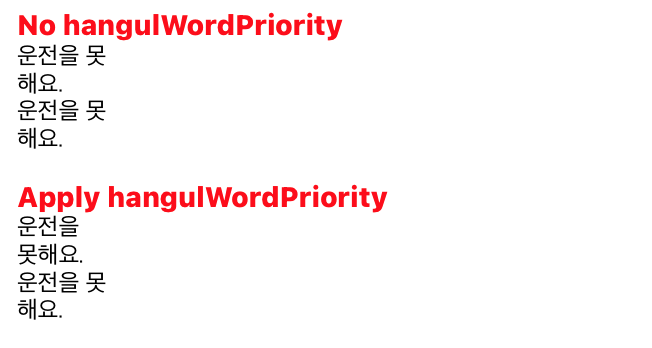
hangulWordPriorityを適用した方は、改行でスペースの有無が曖昧にならないようにしてくれています。
hangulWordPriorityが及ぼす影響はこれだけではないと思いますが、ひとまず韓国向けにアプリを開発される方は適用を検討するといいかもしれませんね。
standard
standard は、標準的なUILabelに用いられるのと同じ制御を加えます。(iOS14以上)
これはUILabelで表示するような短い文章に最適化されているため、長い文章には適さない可能性があります。
↓サンプルコード
func testLineBreakStrategy3() {

    let string = NSMutableAttributedString()

    let text = "東京の空は晴れ、ところにより雲が広がるでしょう。"

    // Indent width to put a line break at behind "し"
    let indent = NSAttributedString(string: String(text.dropLast(3))).size().width

    // No standard
    let styleNonPushOut = NSMutableParagraphStyle()
    styleNonPushOut.tailIndent = indent

    string.append(NSAttributedString(string: "No standard\n", attributes: [
        .font: UIFont.systemFont(ofSize: 14, weight: .heavy),
        .foregroundColor: UIColor.red,
    ]))

    string.append(NSAttributedString(string: "\(text)\n\n", attributes: [
        .paragraphStyle: styleNonPushOut
    ]))

    // Apply standard
    let stylePushOut = NSMutableParagraphStyle()
    stylePushOut.lineBreakStrategy = .standard
    stylePushOut.tailIndent = indent

    string.append(NSAttributedString(string: "Apply standard\n", attributes: [
        .font: UIFont.systemFont(ofSize: 14, weight: .heavy),
        .foregroundColor: UIColor.red,
    ]))

    string.append(NSAttributedString(string: "\(text)", attributes: [
        .paragraphStyle: stylePushOut
    ]))

    textView.attributedText = string
}
↓実行結果
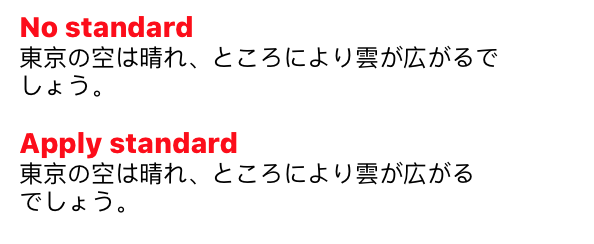
標準的なUILabelに使われるのと同じと言われても、正直、具体的に何がどう変わるのかはわかりませんが (でも公式ドキュメントにそう書いてある) 、ひとまず「ょ」の前で改行を入れようとしたところ、無指定の「しょう。」から「でしょう。」と少しいい感じにしてくれました。(ちなみに、この例ではstandardの代わりにpushOutを指定しても結果は同じになりました)
ですので、iOS14以上で短い文章を表示させる場合は、適用を検討するといいかもしれません。
hyphenationFactor
hyphenationFactor は、ハイフネーションを行うためのしきい値を指定します。
ハイフネーションの意味は以下のサイトをご参照ください。
ハイフネーション 【hyphenation】 – IT用語辞典 e-Words
値として 0.0 〜 1.0 の小数値を指定します。(デフォルトは 0.0)
0.0を指定するとハイフネーション無効、1.0を指定すると必ずハイフネーションを行う設定となります。
そしてその間の数値を指定すると、行の断片の幅に対するハイフンなしで区切られたテキストの幅の比率が指定された数値より小さい場合にハイフネーションを行う、という設定になるようですが、しかし、そういった数値を入れても1.0との違いがわかりませんでした💦
↓サンプルコード
func testHyphenationFactor() {

    // Quotes from hyphenationFactor page of Apple Developer Documentation
    // https://developer.apple.com/documentation/uikit/nsmutableparagraphstyle/1535553-hyphenationfactor
    let text = "Valid values lie between 0.0 and 1.0 inclusive. The default value is 0.0. Hyphenation is attempted when the ratio of the text width (as broken without hyphenation) to the width of the line fragment is less than the hyphenation factor. When the paragraph’s hyphenation factor is 0.0, the layout manager’s hyphenation factor is used instead. When both are 0.0, hyphenation is disabled. This property detects the user-selected language by examining the first item in preferredLanguages."

    let string = NSMutableAttributedString()

    // No hyphenationFactor
    let style1 = NSMutableParagraphStyle()
    style1.tailIndent = -20

    string.append(NSAttributedString(string: "No hyphenationFactor\n", attributes: [
        .font: UIFont.systemFont(ofSize: 14, weight: .heavy),
        .foregroundColor: UIColor.red,
    ]))

    string.append(NSAttributedString(string: "\(text)\n\n", attributes: [
        .paragraphStyle: style1,
    ]))

    // Apply hyphenationFactor
    let style2 = NSMutableParagraphStyle()
    style2.tailIndent = -20
    style2.hyphenationFactor = 1.0

    string.append(NSAttributedString(string: "Apply hyphenationFactor\n", attributes: [
        .font: UIFont.systemFont(ofSize: 14, weight: .heavy),
        .foregroundColor: UIColor.red,
    ]))

    string.append(NSAttributedString(string: "\(text)", attributes: [
        .paragraphStyle: style2,
    ]))

    textView.attributedText = string
}
↓実行結果
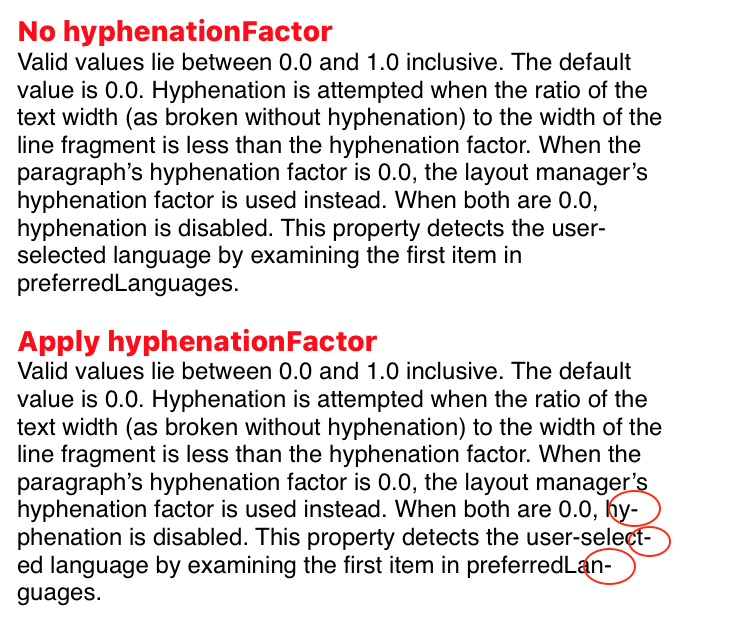
テキストは公式ドキュメントからの引用になります。
hyphenationFactor – Apple Developer Documentation
赤い丸を付けた部分がハイフンで区切られていることがわかります。
allowsDefaultTighteningForTruncation
allowsDefaultTighteningForTruncation は、行に収まらないテキストの切り捨て (省略) が行われる前に、文字間のスペースを縮小させることを許可するかどうかを指定します。
値としてtrue/falseのBool値を指定します。 (デフォルトはfalse)
↓サンプルコード
func testAllowsDefaultTighteningForTruncation() {

    let text = "Dorothy lived in the midst of the great Kansas prairies, with Uncle Henry, who was a farmer, and Aunt Em, who was the farmer's wife."

    let string = NSMutableAttributedString()

    // No allowsDefaultTighteningForTruncation
    let style1 = NSMutableParagraphStyle()
    style1.lineBreakMode = .byTruncatingTail

    string.append(NSAttributedString(string: "No allowsDefaultTighteningForTruncation\n", attributes: [
        .font: UIFont.systemFont(ofSize: 14, weight: .heavy),
        .foregroundColor: UIColor.red,
    ]))

    string.append(NSAttributedString(string: "\(text)\n\n", attributes: [
        .paragraphStyle: style1,
    ]))

    // Apply allowsDefaultTighteningForTruncation
    let style2 = NSMutableParagraphStyle()
    style2.lineBreakMode = .byTruncatingTail
    style2.allowsDefaultTighteningForTruncation = true

    string.append(NSAttributedString(string: "Apply allowsDefaultTighteningForTruncation\n", attributes: [
        .font: UIFont.systemFont(ofSize: 14, weight: .heavy),
        .foregroundColor: UIColor.red,
    ]))

    string.append(NSAttributedString(string: "\(text)", attributes: [
        .paragraphStyle: style2,
    ]))

    textView.attributedText = string
}
↓実行結果
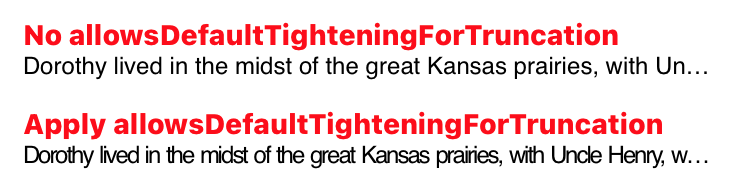
字が詰められて表示されました。
タブストップに関する項目
タブストップに関する項目は以下の2つになります。
- tabStops
- defaultTabInterval
tabStops
tabStops は、その名の通りタブストップに関する設定を行います。
タブストップというのは、テキストエディタやWordなどでTabキーを押す (タブ文字を挿入する) と、カーソル (入力位置) が特定の場所まで移動しますが、そのカーソルの停止位置のことを言います。
Tab stop – Wikipedia
エディタでテキストの水平位置を揃えたりするのに使用するあれです。
値はNSTextTabの配列を指定します。
使用方法については後ほど、次に挙げるdefaultTabIntervalと一緒に説明します。
defaultTabInterval
defaultTabInterval は、tabStopsで定義した数以上にタブ文字が打たれた場合の、タブストップの幅間隔を指定します。
値はCGFloat型の小数値で、デフォルトは0.0です。
こちらは百聞は一見にしかずなので、tabStopsと共にサンプルで説明します。
まとめて見てみる
tabStopsとdefaultTabIntervalを使った例を見ていきます。
↓サンプルコード
func testTabStops() {
let data: [(alphabet: String, fruit: String, animal: String, point: Double, os: String)] = [
("A", "Apple", "Ape", 1234.5, "Android"),
("B", "Broccoli", "Bird", 123.45, "Berry Linux"),
("C", "Carrot", "Cat", 12.345, "CentOS"),
("D", "Daikon", "Dog", 1.2345, "DOS"),
("E", "Eggplant", "Elephant", 123, "/e/"),
]
let attributes = [
NSAttributedString.Key.backgroundColor: UIColor.red.withAlphaComponent(0.1)
]
let style = NSMutableParagraphStyle()
style.paragraphSpacing = 20
style.defaultTabInterval = 60
//style.tabStops = [
// NSTextTab(textAlignment: .right, location: 80),
// NSTextTab(textAlignment: .center, location: 120),
// NSTextTab(textAlignment: .natural, location: 180, options: [
// .columnTerminators: NSCharacterSet(charactersIn: ".")
// ]),
//]
let string = NSMutableAttributedString(string: "")
data.forEach {
string.append(NSAttributedString(string: "\($0.alphabet):", attributes: attributes))
string.append(NSAttributedString(string: "\t"))
string.append(NSAttributedString(string: "\($0.fruit)", attributes: attributes))
string.append(NSAttributedString(string: "\t"))
string.append(NSAttributedString(string: "\($0.animal)", attributes: attributes))
string.append(NSAttributedString(string: "\t"))
string.append(NSAttributedString(string: "\($0.point)", attributes: attributes))
string.append(NSAttributedString(string: "\t"))
string.append(NSAttributedString(string: "\($0.os)", attributes: attributes))
string.append(NSAttributedString(string: "\n"))
}
string.addAttributes([
.paragraphStyle: style
], range: NSRange(0..<string.length))
textView.attributedText = string
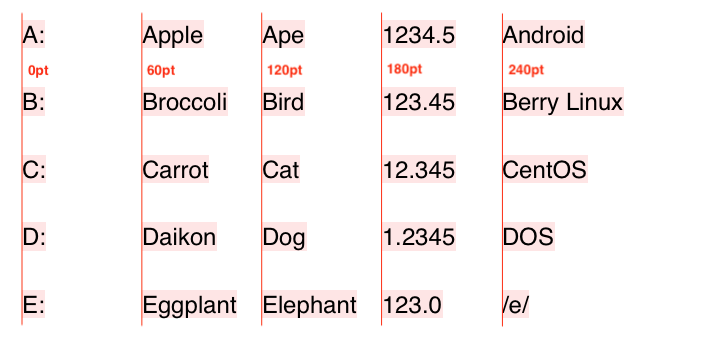
}18〜24行目がコメントアウトされていますが、まずはこのまま実行してみます↓

画像中に赤線と各線の左端からの位置 (ポイント数) を描き込んでいますが、これが現状のタブストップの場所になります。
tabStopsはデフォルトで「左寄せ・28pt」、「左寄せ・56pt」、「左寄せ・84pt」… (以下、28pt間隔で同様) というNSTextTabが12個定義されていますので、このような結果になります。
そしてdefaultTabIntervalに60を設定していますが、defaultTabIntervalはtabStopsが足りなくなった後のタブ間隔であるため、ここでは特に役目を持ちません。
そこで、一度tabStopsを空にしてみます↓
style.defaultTabInterval = 60
style.tabStops = [
//    NSTextTab(textAlignment: .right, location: 80),
//    NSTextTab(textAlignment: .center, location: 120),
//    NSTextTab(textAlignment: .natural, location: 180, options: [
//      .columnTerminators: NSCharacterSet(charactersIn: ".")
//  ]),
]
これで実行すると以下のようになります↓
tabStopsが空なので、すべてdefaultTabIntervalで指定した60ptの間隔で表示されました。
では次に、tabStopsにオリジナルの中身を設定してみます↓
style.defaultTabInterval = 60
style.tabStops = [
    NSTextTab(textAlignment: .right, location: 80),
    NSTextTab(textAlignment: .center, location: 120),
    NSTextTab(textAlignment: .natural, location: 180, options: [
      .columnTerminators: NSCharacterSet(charactersIn: ".")
  ]),
]
NSTextTabが持つメンバーは以下の3つです。
・alignment
文字揃え。NSTextAlignmentのいずれかを指定します。
タブストップ (↓のlocationで指定した位置) を基点としてテキストの描画がされるため、rightやcenterを指定する場合は、locationの位置がテキストの右端や中央になることに注意してください。
・location
タブストップの位置 (CGFloat) を指定します。
前のタブ文字からの相対位置ではなく、行頭からの絶対位置になります。
・options
NSTextTab.OptionKeyをキーとしたDictionaryを指定します。
今のところ、NSCharacterSetを値に取るcolumnTerminatorsしか定義されていません。(iOS14最新現在)
columnTerminatorsを指定すると、NSCharacterSetで定義した文字がそのタブ列の終了文字として判断されるようになります。
これを実行すると以下のようになります↓
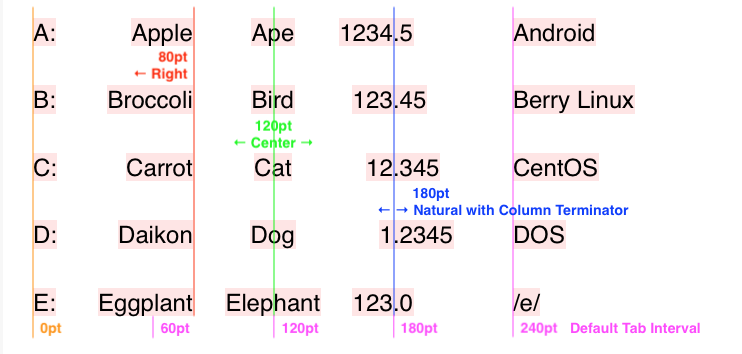
描き込んだ線と説明を見ていただければわかるかと思いますが、赤、緑、青がそれぞれtabStopsで定義したもので、ピンク色がtabStops不足のためのdefaultTabIntervalによるタブストップとなっています。
特に青色のoptionsでピリオド (.) を終了文字として指定した列は、タブストップの位置にピリオドが来るよう揃えられるため、こうした数値を表示させるのに便利ですね。
ちなみに、columnTerminatorsを指定した際のalignmentにrightやcenterなどを指定しても、上手いようにはなりませんでした。 (どんな感じかは試してみてください)
また、columnTerminators関係なく、alignmentにjustifiedを指定してもjustifiedにはなってくれませんでした。
何はともあれ、以上でNSParagraphStyleに設定する項目の説明は以上になります。
参考リンク
・NSMutableParagraphStyle – Apple Developer Documentation
https://developer.apple.com/documentation/uikit/nsmutableparagraphstyle
おわりに
前回、前々回の記事と合わせて、NSAttributedStringで設定できる項目を一通り紹介させていただきました。
個人的な感想として、これまであまり使ってこなかった・知らなかった項目がたくさんあったのですが、知っていればこの先使える場面は多々あるように思いました。
この記事が皆様の素敵なテキスト装飾ライフの一助となりましたら幸いです。
それでは。