はじめに
前回の記事で、NSAttributedStringで文字列に装飾を施す際に使用できる属性 (NSAttributedString.Key) の一覧についてまとめました。
今回はその中で省略となっていた NSAttributedString.Key.paragraphStyle で設定する値、
NSParagraphStyle (実際に使用するのはNSMutableParagraphStyle) についてまとめたいと思います。
※ 内容が長いため、記事を2つに分けています。後半の記事はこちらになります。
ここではiOSを対象としておりますため、macOS専用の項目については触れておりません。
また、ここではNSAttributedStringやNSMutableAttributedString自体の使い方についても触れておりませんのでご注意願います。
開発環境は Xcode 12.5 / Swift 5.4 です。
Playgroundの下準備
前回の記事同様、Playgroundで実際に動かして試せるよう、まずはベースとなるソースを載せたいと思います。
import UIKit
import PlaygroundSupport

class ViewController: UIViewController {

    weak var textView: UITextView!

    override func loadView() {

        let view = UIView()
        view.backgroundColor = .systemBackground
        self.view = view

        // Create a UITextView
        let textView = UITextView()
        view.addSubview(textView)
        textView.translatesAutoresizingMaskIntoConstraints = false
        textView.leadingAnchor.constraint(equalTo: view.leadingAnchor, constant: 10).isActive = true
        textView.trailingAnchor.constraint(equalTo: view.trailingAnchor, constant: -10).isActive = true
        textView.topAnchor.constraint(equalTo: view.topAnchor, constant: 10).isActive = true
        textView.bottomAnchor.constraint(equalTo: view.bottomAnchor, constant: -10).isActive = true
        textView.isEditable = false
        textView.isSelectable = true
        self.textView = textView

        test()
    }

    func test() {
//        testLineHeightAndSpacing()
//        testParagraphSpacing()
//        testIndent()
//        testAlignment()
//        testBaseWritingDirection()
//        testBaseWritingDirection2()
//        testLineBreakMode()
//        testLineBreakStrategy1()
//        testLineBreakStrategy2()
//        testLineBreakStrategy3()
//        testHyphenationFactor()
//        testAllowsDefaultTighteningForTruncation()
//        testTabStops()
    }
}

extension NSTextAlignment: CustomStringConvertible {

    public var description: String {
        switch self {
            case .left: return "left"
            case .center: return "center"
            case .right: return "right"
            case .justified: return "justified"
            case .natural: return "natural"
        }
    }
}

extension NSWritingDirection: CustomStringConvertible {

    public var description: String {
        switch self {
            case .natural: return "natural"
            case .leftToRight: return "leftToRight"
            case .rightToLeft: return "rightToLeft"
        }
    }
}

extension NSWritingDirectionFormatType: CustomStringConvertible {

    public var description: String {
        switch self {
            case .embedding: return "embedding"
            case .override: return "override"
        }
    }
}

extension NSLineBreakMode: CustomStringConvertible {

    public var description: String {
        switch self {
            case .byWordWrapping: return "byWordWrapping"
            case .byCharWrapping: return "byCharWrapping"
            case .byClipping: return "byClipping"
            case .byTruncatingHead: return "byTruncatingHead"
            case .byTruncatingTail: return "byTruncatingTail"
            case .byTruncatingMiddle: return "byTruncatingMiddle"
        }
    }
}

PlaygroundPage.current.liveView = ViewController()コメントアウトになっているtest〜の各関数については、以下にNSMutableParagraphStyleで設定できる項目の詳細に触れながら載せていきたいと思います。
それでは一つずつ見ていきましょう。
行の高さ、行間のスペースに関する項目
行の高さ、行間のスペースの幅に関する項目は以下の4つになります。
- lineHeightMultiple
- minimumLineHeight
- maximumLineHeight
- lineSpacing
これらの動きを以下のサンプルコードを使って見ていきたいと思います↓
func testLineHeightAndSpacing() {

    let string = NSMutableAttributedString()

    if let image = UIImage(named: "monogatari_oz") {
        let attachment = NSTextAttachment()
        attachment.image = image
        attachment.bounds = CGRect(x: 0, y: 0, width: 60, height: 40)

        string.append(NSAttributedString(attachment: attachment))
    }

    string.append(NSAttributedString(string: "Dorothy lived in the midst of the great Kansas prairies, with Uncle Henry, who was a farmer, and Aunt Em, who was the farmer's wife."))

    let style = NSMutableParagraphStyle()
    //style.lineHeightMultiple = 2.0
    //style.minimumLineHeight = 30.0
    //style.maximumLineHeight = 50.0
    //style.lineSpacing = 20.0

    string.addAttributes([
        .paragraphStyle: style,
        .backgroundColor: UIColor(white: 0.8, alpha: 1.0),
    ], range: NSRange(0..<string.length))

    textView.attributedText = string
}
lineHeightMultiple
lineHeightMultiple は、行の高さを乗算によって変更します。
各行の高さは、フォントサイズやNSTextAttachmentで差し込まれた画像の高さなどを基に、それが自然と収まる分の値が求められ設定されますが、lineHeightMultipleはこれに指定した数値を乗算して拡大または縮小します。
上記サンプルコードの16〜19行目がコメントアウトされていますが、まずは何も設定しないデフォルトの結果が見たいので、そのまま実行してみます↓
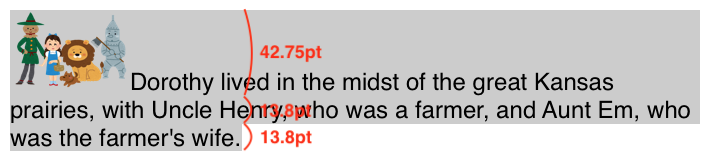
結果、画像のある先頭行は42.75ptの高さ、それ以外の行は13.8ptの高さになりました。
次に、サンプルコードの16行目のコメントアウトを解除して実行してみます。
style.lineHeightMultiple = 2.0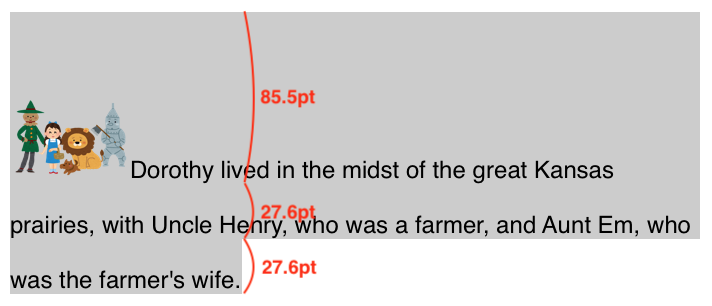
2.0を指定したので、結果は各行それぞれ倍の高さとなりました。
lineHeightMultipleのデフォルト値は0.0です。
0.0を指定しても高さが0にはなりません。
また、乗算なので当然1.0を指定しても0.0と同じ高さになります。
minimumLineHeight
minimumLineHeight は、行に最小限の高さの制約を加えます。
上記サンプルコードの17行目のコメントアウトを解除して実行してみます。
style.minimumLineHeight = 30.0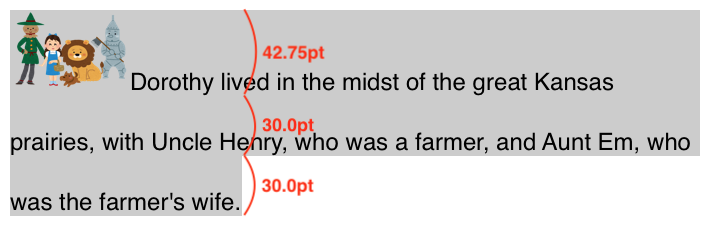
結果、先頭行を除く30ptより低かった行がそれぞれ30ptの高さとなりました。
なお、lineHeightMultipleを同時に設定している場合、lineHeightMultipleで乗算された後の高さがminimumLineHeightで設定した高さより低かった場合に、minimumLineHeightの高さが適用されますので、同時に「lineHeightMultiple = 2.0」を設定しても60ptの高さにはなりません。
maximumLineHeight
maximumLineHeight は、行に最大限の高さの制約を加えます。
上記サンプルコードの16, 18行目のコメントアウトを解除して実行してみます。
style.lineHeightMultiple = 2.0
style.maximumLineHeight = 50.0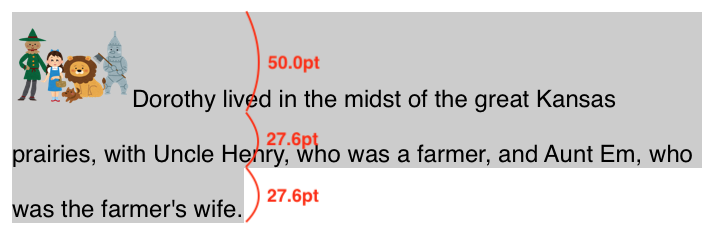
上で「lineHeightMultiple = 2.0」だけを設定していた場合、画像のある先頭行が85.5ptととんでもなく高くなってしまっていましたが、これに「maximumLineHeight = 50.0」を加えてあげたことで各行の最大の高さが50ptまでとなり、無駄にスペースが空いてしまうのを避けることができました。
lineSpacing
lineSpacing は、行間のスペース幅を設定します。
上記サンプルコードの19行目のコメントアウトを解除して実行してみます。
style.lineSpacing = 20.0
結果はそのままです。
段落間のスペースに関する項目
段落間のスペースに関する項目は以下の2つになります。
- paragraphSpacing
- paragraphSpacingBefore
これらの動きを以下のサンプルコードを使って見ていきたいと思います↓
func testParagraphSpacing() {

    let CR = "\r"
    let LF = "\n"
    let paragraphSeparator = "\u{2029}"
    let lineSeparator = "\u{2028}"
    let backgroundColor1 = UIColor(white: 0.8, alpha: 1.0)
    let backgroundColor2 = UIColor.green.withAlphaComponent(0.2)

    let string = NSMutableAttributedString()

    string.append(NSAttributedString(string: "Dorothy lived in the midst of the great Kansas prairies,", attributes: [.backgroundColor: backgroundColor1]))
    string.append(NSAttributedString(string: "\(CR)with Uncle Henry,", attributes: [.backgroundColor: backgroundColor2]))
    string.append(NSAttributedString(string: "\(LF)who was a farmer,", attributes: [.backgroundColor: backgroundColor1]))
    string.append(NSAttributedString(string: "\(CR)\(LF)and Aunt Em,", attributes: [.backgroundColor: backgroundColor2]))
    string.append(NSAttributedString(string: "\(paragraphSeparator)who was", attributes: [.backgroundColor: backgroundColor1]))
    string.append(NSAttributedString(string: "\(lineSeparator)the farmer's wife.", attributes: [.backgroundColor: backgroundColor2]))

    let style = NSMutableParagraphStyle()
    //style.paragraphSpacing = 10
    //style.paragraphSpacingBefore = 10

    string.addAttributes([
        .paragraphStyle: style,
    ], range: NSRange(0..<string.length))

    textView.attributedText = string
}
20, 21行目がコメントアウトされていますが、まずはそのまま実行してみます。
結果↓
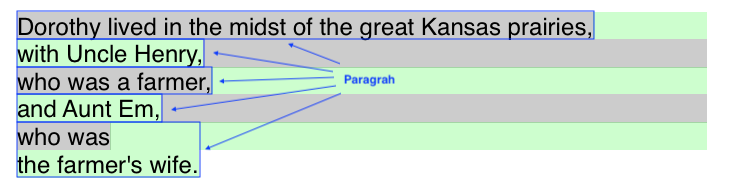
iOSにおいて、段落を区切るために使用できる制御文字は以下の4つになります。
・\r (CR, Carriage Return, 行頭復帰コード, 0x0D)
・\n (LF, Line Feed, 改行コード, 0x0A)
・\r\n (CR + LF)
・\u{2029} (Unicode U+2029, Paragraph Separator)
サンプルでは \u{2028} (Unicode U+2028, Line Separator) も使っていますが、これは単に改行するだけなので、結果としてこのサンプルでの段落は↑で青枠で示した5つになります。
1行ごとに色分けしているのは、段落の範囲を見やすくするためです。
paragraphSpacing
paragraphSpacing は、段落間のスペースの幅を設定します。
上記サンプルコードの20行目のコメントアウトを解除して実行してみます。
style.paragraphSpacing = 10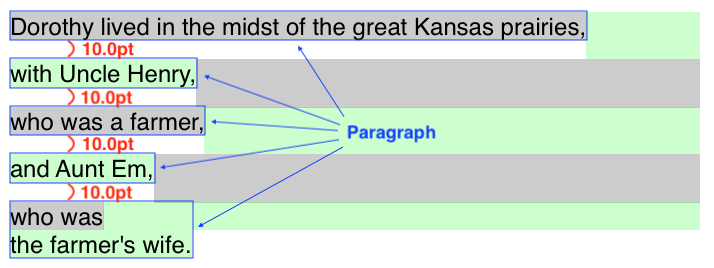
結果、段落と段落の間にそれぞれ10.0ptずつのスペースが設けられました。
paragraphSpacingBefore
paragraphSpacingBefore は段落の上辺と、その段落のテキストコンテンツの開始位置との間のスペースを設定します。
上記サンプルコードの21行目のコメントアウトを解除して実行してみます。
style.paragraphSpacingBefore = 10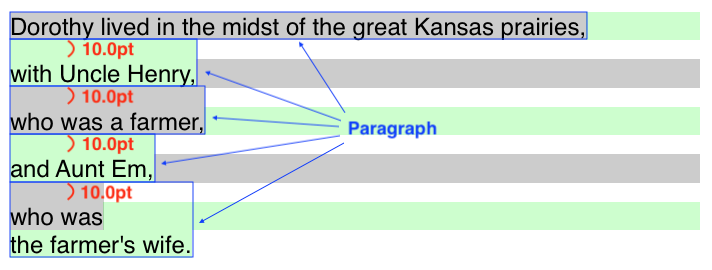
色を付けてやっとわかる違いですが、確かにparagraphSpacingとは違って段落と文字との間にスペースが生じているのが確認できました。
ただし先頭の段落にはつかないようなので、そこは注意が必要かと思います。
字下げ (インデント) に関する項目
字下げ (インデント) に関する項目は以下の3つになります。
- firstLineHeadIndent
- headIndent
- tailIndent
これらの動きを以下のサンプルコードを使って見ていきたいと思います↓
func testIndent() {

    let string = NSMutableAttributedString()

    if let image = UIImage(named: "monogatari_oz") {
        let attachment = NSTextAttachment()
        attachment.image = image
        attachment.bounds = CGRect(x: 0, y: 0, width: 60, height: 40)

        string.append(NSAttributedString(attachment: attachment))
    }

    string.append(NSAttributedString(string: "Dorothy lived in the midst of the great Kansas prairies, with Uncle Henry, who was a farmer, and Aunt Em, who was the farmer's wife.\n\nTheir house was small, for the lumber to build it had to be carried by wagon many miles."))

    let style = NSMutableParagraphStyle()
    style.firstLineHeadIndent = 20
    style.headIndent = 10
    style.tailIndent = 300

    string.addAttributes([
        .paragraphStyle: style,
        .backgroundColor: UIColor(white: 0.8, alpha: 1.0),
    ], range: NSRange(0..<string.length))

    textView.attributedText = string
    textView.backgroundColor = UIColor.green.withAlphaComponent(0.2)
}
firstLineHeadIndent
firstLineHeadIndent は、段落内の先頭行の字下げ幅を設定します。
デフォルトは0.0で、プラスの値のみ有効となります。
headIndent
headIndent は、段落内の2行目以降の字下げ幅を設定します。
デフォルトは0.0で、プラスの値のみ有効となります。
tailIndent
tailIndent は、段落末尾の字上げ幅を設定します。
デフォルトは0.0で、プラスの値を指定すると段落の “始端” からテキスト末尾までの幅 (左から右へ記述する言語の場合、左辺位置からテキスト右端までの幅。右から左の言語の場合、右辺位置からテキスト左端まで) となり、マイナスの値を指定すると段落の “終端” からテキスト末尾までの幅 (こちらも言語の方向により左右逆になる) となります。
まとめて見てみる
3つのインデントに関する項目の動作をまとめて見てみたいと思います。
まずは上記サンプルのまま実行してみます。
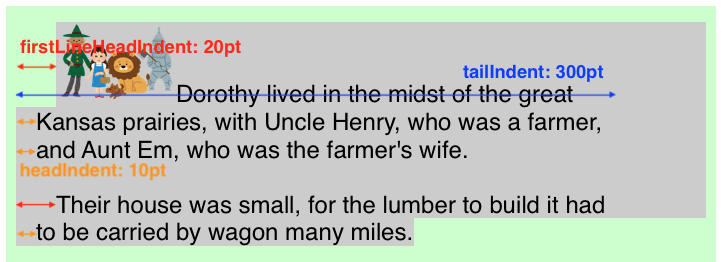
結果はこうなりました↑
続いて、tailIndentをマイナス値にして試してみたいと思います。
style.tailIndent = -20
結果、段落の右辺から20ptの字上げとなりました。
文字揃え (アライメント) に関する項目
alignment
alignment は、段落内の文字揃えを設定します。
値にはNSTextAlignmentのいずれかを指定します。
↓サンプルコード
func testAlignment() {

    let string = NSMutableAttributedString()

    [NSTextAlignment.natural, .left, .right, .center, .justified].forEach { alignment in

        string.append(NSAttributedString(string: "\(alignment)\n", attributes: [
            .font: UIFont.systemFont(ofSize: 14, weight: .heavy),
            .foregroundColor: UIColor.red,
        ]))

        let style = NSMutableParagraphStyle()
        style.alignment = alignment

        string.append(NSAttributedString(string: "Dorothy lived in the midst of the great Kansas prairies, with Uncle Henry, who was a farmer, and Aunt Em, who was the farmer's wife.", attributes: [
            .paragraphStyle: style,
            .backgroundColor: UIColor(white: 0.8, alpha: 1.0),
        ]))

        string.append(NSAttributedString(string: "\n\n"))
    }

    textView.attributedText = string
}
これを実行すると以下のような結果になります↓
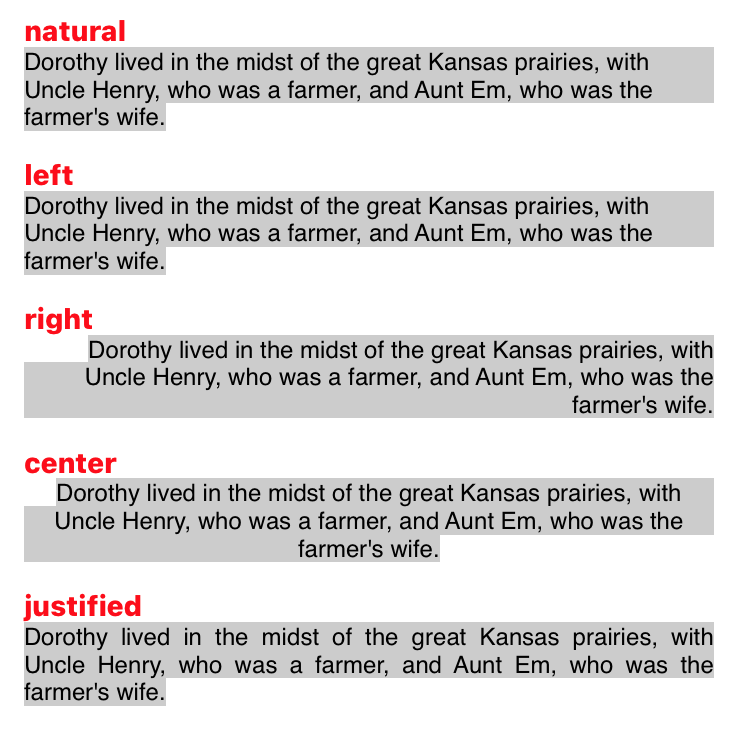
natural はアプリに設定された言語の向きにより、左揃えまたは右揃えのどちらかになります。
テキストの書記方向に関する項目
baseWritingDirection
baseWritingDirection は、段落内のテキストの書記方向 (左から右へと書く「左横書き」、または右から左へと書く「右横書き」) を設定します。
値にはNSWritingDirectionのいずれかを指定します。
↓サンプルコード
func testBaseWritingDirection() {

    let arabicHello = "أهلا"
    let englishHello = "Hello"

    let string = NSMutableAttributedString()

    [NSWritingDirection.natural, .leftToRight, .rightToLeft].forEach { direction in

        // Title
        string.append(NSAttributedString(string: "\(direction)\n", attributes: [
            .font: UIFont.systemFont(ofSize: 14, weight: .heavy),
            .foregroundColor: UIColor.red,
        ]))

        let style = NSMutableParagraphStyle()
        style.baseWritingDirection = direction

        // Arabian first, English second
        string.append(NSAttributedString(string: "😃 \(arabicHello) \(englishHello)", attributes: [
            .paragraphStyle: style,
            .backgroundColor: UIColor(white: 0.8, alpha: 1.0),
        ]))

        string.append(NSAttributedString(string: "\n"))

        // English first, Arabian second
        string.append(NSAttributedString(string: "😃 \(englishHello) \(arabicHello)", attributes: [
            .paragraphStyle: style,
            .backgroundColor: UIColor(white: 0.8, alpha: 1.0),
        ]))

        string.append(NSAttributedString(string: "\n\n"))
    }

    textView.attributedText = string
}
これを実行すると以下のような結果になります↓
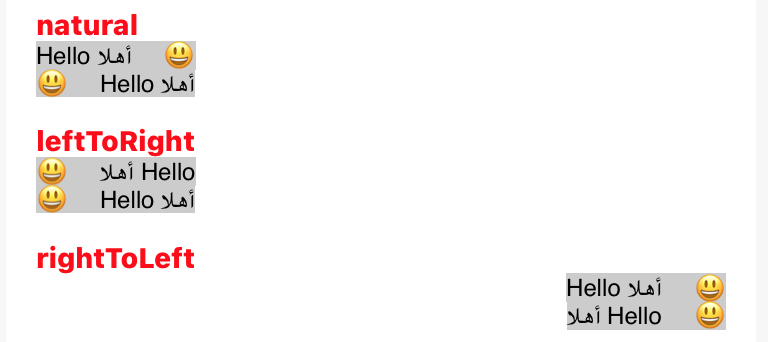
naturalを指定すると、行の先頭から走査して、最初に日本語や英語のような左横書きの文字が見つかると左→右の向きに、アラビア語やヘブライ語のような右横書きの文字が見つかると右→左の向きになります。 (絵文字や記号等は除く)
そのため、アラビア語が最初に来ている方は右横書きで「英語 ← アラビア語 ← 😃」の順に、英語が先に来ている方は左横書きで「😃 → 英語 → アラビア語」の順になっています。
leftToRightやrightToLeftを指定すると、この走査を行わずその設定で強制します。
なお、baseWritingDirectionでは段落内の書記方向を変えるだけですので、「olleH」のように文字単位で並びが変わることにはなりません。
NSAttributedString.Key.writingDirectionとの違い
実はNSAttributedStringのKeyに、writingDirectionという似た項目があります。
NSAttributedString.Key.writingDirectionとNSParagraphStyleのbaseWritingDirectionの違いは、ざっくりと前者がUnicode Standard Annex #9に沿って文字単位の方向まで変更できるのに対し、後者は上述のとおり段落単位での方向を変更できるという違いになります。
※ NSAttributedString.Key.writingDirectionの詳細については、前回の記事のwritingDirectionの項をご参照ください。
で、エンジニアの本能に従い、これらを掛け合わせるとどういう動きになるのか試してみたいと思います↓
func testBaseWritingDirection2() {

    let arabicHello = "أهلا"
    let englishHello = "Hello"

    let string = NSMutableAttributedString()

    [NSWritingDirection.natural, .leftToRight, .rightToLeft].forEach { baseDirection in
        [NSWritingDirection.natural, .leftToRight, .rightToLeft].forEach { direction in
            [NSWritingDirectionFormatType.embedding, .override].forEach { type in

                // Title
                let title = "base-\(baseDirection) + \(direction) + \(type)"
                string.append(NSAttributedString(string: "\(title)\n", attributes: [
                    .font: UIFont.systemFont(ofSize: 14, weight: .heavy),
                    .foregroundColor: UIColor.red,
                ]))

                let style = NSMutableParagraphStyle()
                style.baseWritingDirection = baseDirection

                // Arabian first, English second
                string.append(NSAttributedString(string: "😃 \(arabicHello) \(englishHello)", attributes: [
                    .paragraphStyle: style,
                    .backgroundColor: UIColor(white: 0.8, alpha: 1.0),
                    .writingDirection: [direction.rawValue | type.rawValue],
                ]))

                string.append(NSAttributedString(string: "\n"))

                // English first, Arabian second
                string.append(NSAttributedString(string: "😃 \(englishHello) \(arabicHello)", attributes: [
                    .paragraphStyle: style,
                    .backgroundColor: UIColor(white: 0.8, alpha: 1.0),
                    .writingDirection: [direction.rawValue | type.rawValue],
                ]))

                string.append(NSAttributedString(string: "\n\n"))
            }
        }
    }

    textView.attributedText = string
}
結果は以下のようになりました↓
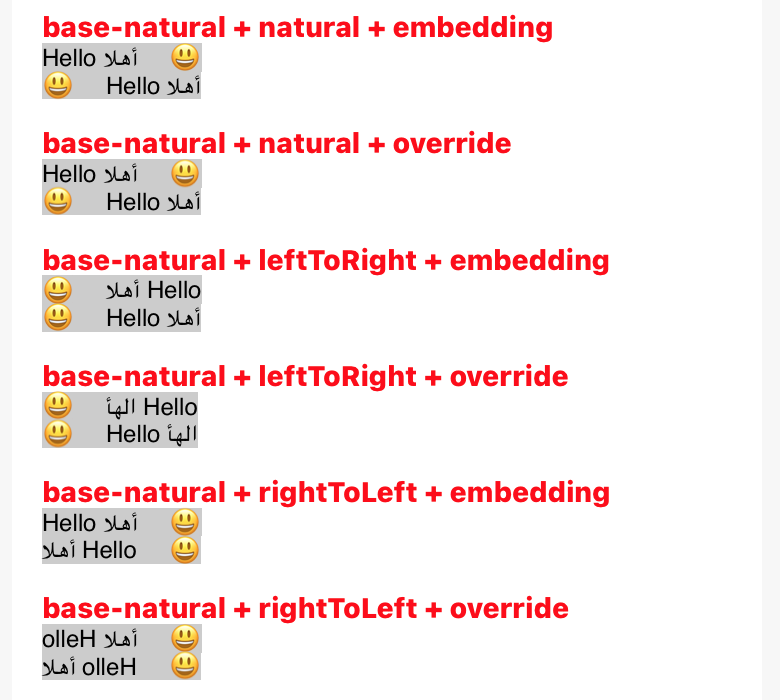
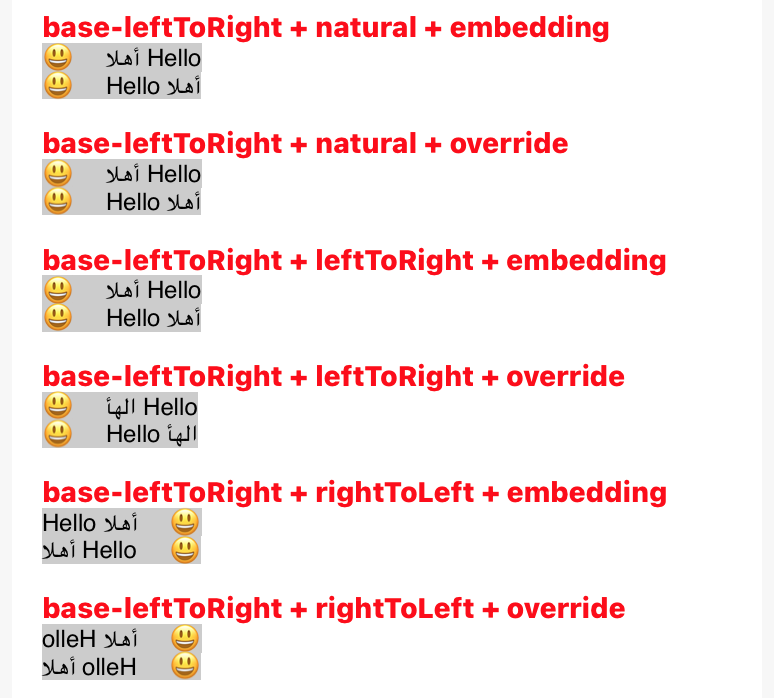
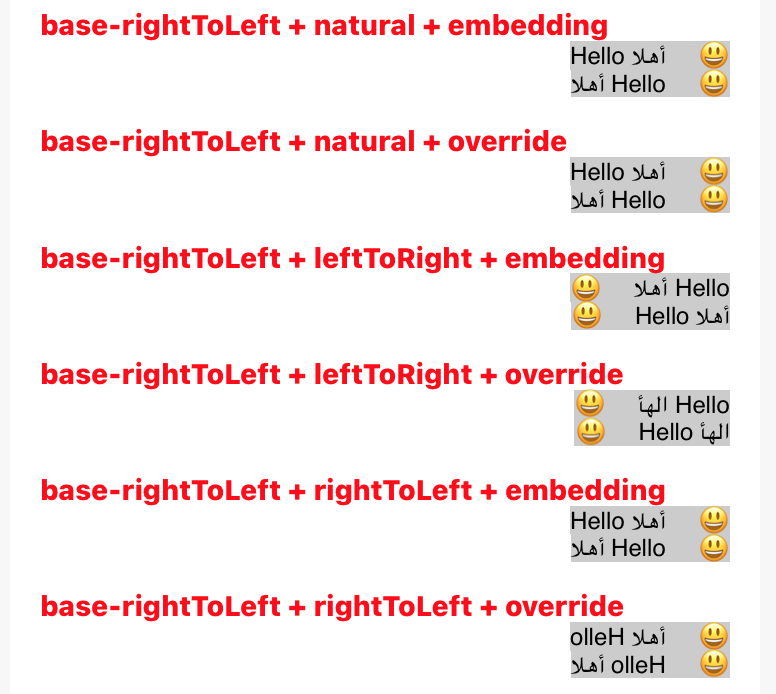
baseWritingDirectionでrightToLeftを指定しないと、段落の右端から書き出すということにはならないようです。
そこはalignmentとの掛け合わせになるのでしょうかね。
つづく
長くなったため、残りの項目は次の記事へ続きます。