はじめに
今回はNSAttributedStringで文字列に装飾をする際に指定できる属性 (NSAttributedString.Key) についてまとめたいと思います。
ここではiOSを対象としておりますため、macOS専用のKeyについては触れておりません。
また、ここではNSAttributedStringやNSMutableAttributedString自体の使い方についても触れておりませんのでご注意願います。
開発環境は Xcode 12.5 / Swift 5.4 です。
Playgroundの下準備
NSAttributedString.Keyを見ていく前に、皆さんも実行して試せるようPlaygroundのベースとなるコードを載せます。
import UIKit
import PlaygroundSupport

class ViewController: UIViewController {

    weak var label: UILabel!
    weak var textView: UITextView!

    override func loadView() {

        let view = UIView()
        view.backgroundColor = .systemBackground
        self.view = view

        // Create a UITextView
        let textView = UITextView()
        view.addSubview(textView)
        textView.translatesAutoresizingMaskIntoConstraints = false
        textView.leadingAnchor.constraint(equalTo: view.leadingAnchor, constant: 10).isActive = true
        textView.trailingAnchor.constraint(equalTo: view.trailingAnchor, constant: -10).isActive = true
        textView.topAnchor.constraint(equalTo: view.topAnchor, constant: 10).isActive = true
        textView.bottomAnchor.constraint(equalTo: view.bottomAnchor, constant: -10).isActive = true
        textView.delegate = self
        textView.isEditable = false
        textView.isSelectable = true
        self.textView = textView

        // Create a UILabel
        let label = UILabel()
        view.addSubview(label)
        label.translatesAutoresizingMaskIntoConstraints = false
        label.leadingAnchor.constraint(equalTo: view.leadingAnchor, constant: 10).isActive = true
        label.topAnchor.constraint(equalTo: view.topAnchor, constant: 10).isActive = true
        label.numberOfLines = 0
        self.label = label

        test()
    }

    func test() {
//        testAttachment()
//        testBackgroundColor()
//        testBaselineOffset()
//        testExpansion()
//        testFont()
//        testForegroundColor()
//        testLigature()
//        testKern()
//        testLink()
//        testObliqueness()
//        testShadow()
//        testStrikethrough()
//        testStroke()
//        testTextEffect()
//        testTracking()
//        testUnderline()
//        testVerticalGlyphForm()
//        testWritingDirection()
    }
}

extension ViewController: UITextViewDelegate {
}

PlaygroundPage.current.liveView = ViewController()
UIとしてUITextViewとUILabelの2つを用意しているのは、単にどちらでも試せるようにというのと、KeyによってはUILabelで有効にならないものがあるため、その差異が見られるようにするためです。
UITextFieldについてはここでは省いていますので、必要な方は追加して試してみてください。
test関数の中にコメントアウトしたtest〜関数が並んでいますが、これらはこれから以下に書いていくものになります。
試したいKeyを切り替えて実行しやすいよう、このような形にしています。
それでは一つずつ見ていきたいと思います。
NSAttributedString.Key
attachment
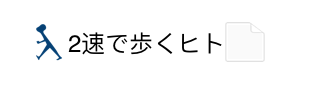
attachment は文章中に画像を差し込んだりファイルを添付するのに使用します。
func testAttachment() {

    let string = NSMutableAttributedString()

    // Attach a logo image
    if let image = UIImage(named: "logo") {
        let attachment = NSTextAttachment()
        attachment.image = image
        attachment.bounds = CGRect(x: 0, y: -5, width: 20, height: 20)

        string.append(NSAttributedString(attachment: attachment))
    }

    string.append(NSAttributedString(string: "2速で歩くヒト"))

    // Attach a file data
    let attachment = NSTextAttachment()
    attachment.contents = "Hello".data(using: .utf8)
    attachment.fileType = "txt"
    attachment.bounds = CGRect(x: 0, y: -5, width: 20, height: 20)
    string.append(NSAttributedString(attachment: attachment))

    textView.attributedText = string
}
NSTextAttachment を作成して、画像もしくはファイル (Data + 拡張子 もしくは FileWrapper)をセットします。
そしてそれを、init(attachment: NSTextAttachment) でNSAttributedStringにしてあげます。
これを実行すると以下のようになります↓
また、UITextViewの場合、UITextViewDelegateのtextView(_:shouldInteractWith:in:interaction:)メソッドを使って、ユーザーが画像やファイルをタップするのを検知することができます。
extension ViewController: UITextViewDelegate {

    func textView(_ textView: UITextView, shouldInteractWith textAttachment: NSTextAttachment, in characterRange: NSRange, interaction: UITextItemInteraction) -> Bool {

        if textAttachment.image != nil {
            print("Tapped the attached logo")
        }
        else if textAttachment.contents != nil {
            print("Tapped the attached file")
        }

        return true
    }
}このイベントを発生させるため、UITextViewのisSelectableをtrueにしておく必要があります。 (デフォルトでtrueですけど)
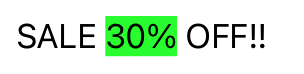
backgroundColor
backgroundColor は文字列の背景色を設定できます。
func testBackgroundColor() {

    let string = NSMutableAttributedString(string: "SALE 30% OFF!!")
    string.addAttribute(.backgroundColor, value: UIColor.green, range: NSRange(5...7))

    label.attributedText = string
}
値にはUIColorのインスタンスを指定します。
これを実行すると以下のようになります↓
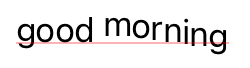
baselineOffset
baselineOffset は文字列に対し、ベースラインからの縦方向の位置をずらすのに使用します。
func testBaselineOffset() {

    let string = NSMutableAttributedString(string: "good morning")
    string.addAttribute(.baselineOffset, value: 3, range: NSRange(location: 5, length: 1))
    string.addAttribute(.baselineOffset, value: 2, range: NSRange(location: 6, length: 1))
    string.addAttribute(.baselineOffset, value: 1, range: NSRange(location: 7, length: 1))
    string.addAttribute(.baselineOffset, value: 0, range: NSRange(location: 8, length: 1))
    string.addAttribute(.baselineOffset, value: -1, range: NSRange(location: 9, length: 1))
    string.addAttribute(.baselineOffset, value: -2, range: NSRange(location: 10, length: 1))
    string.addAttribute(.baselineOffset, value: -3, range: NSRange(location: 11, length: 1))

    label.attributedText = string

    // Add UIView to draw a baseline
    let baseline = UIView()
    view.addSubview(baseline)
    baseline.translatesAutoresizingMaskIntoConstraints = false
    baseline.leadingAnchor.constraint(equalTo: label.leadingAnchor).isActive = true
    baseline.trailingAnchor.constraint(equalTo: label.trailingAnchor).isActive = true
    baseline.topAnchor.constraint(equalTo: label.firstBaselineAnchor).isActive = true
    baseline.heightAnchor.constraint(equalToConstant: 1).isActive = true
    baseline.backgroundColor = UIColor.red.withAlphaComponent(0.3)
}
値には小数値を含んだNSNumberのインスタンスを指定します。 (NSNumberはExpressibleByIntegerLiteralやExpressibleByFloatLiteralに準拠しているため、そのまま数値を指定するのでもOKです)
プラスの値を指定すれば上に、マイナスの値を指定すれば下にずれます。(デフォルトは0)
また、ここではベースラインがどこかわかりやすいよう、UIViewを追加しています。
これを実行すると以下のようになります↓
expansion
expansion は文字列を横方向に拡大・縮小させることができます。
func testExpansion() {

    let string = NSMutableAttributedString(string: "SALE 30% OFF!!")
    string.addAttribute(.expansion, value: -1.0, range: NSRange(0...3))
    string.addAttribute(.expansion, value: 1.0, range: NSRange(5...7))
    string.addAttribute(.expansion, value: 1.5, range: NSRange(9...11))

    label.attributedText = string
}
値には小数値を含んだNSNumberのインスタンスを指定します。
プラスの値を指定すれば拡大、マイナスの値を指定すれば縮小します。(デフォルトは0)
これを実行すると以下のようになります↓

font
font は文字列のフォントを変更するのに使用します。
func testFont() {

    let string = NSAttributedString(string: "JoJo's Bizarre Adventure", attributes: [
        .font: UIFont(name: "PartyLetPlain", size: 24)!
    ])

    label.attributedText = string
}値にはUIFontのインスタンスを指定します。
これを実行すると以下のようになります↓

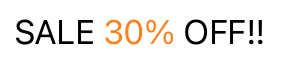
foregroundColor
foregroundColor は文字列の文字色を設定できます。
func testForegroundColor() {

    let string = NSMutableAttributedString(string: "SALE 30% OFF!!")
    string.addAttribute(.foregroundColor, value: UIColor.orange, range: NSRange(5...7))

    label.attributedText = string
}
値にはUIColorのインスタンスを指定します。
これを実行すると以下のようになります↓
kern
kern はカーニングを行うのに使用します。
カーニングは文字と文字の間隔を調整することを言います。
(参考:カーニング – Wikipedia)
func testKern() {

    let string = NSMutableAttributedString(string: "It's cooooool!!")
    string.addAttribute(.kern, value: 4, range: NSRange(location: 4, length: 1))
    string.addAttribute(.kern, value: -6, range: NSRange(location: 6, length: 1))
    string.addAttribute(.kern, value: -3, range: NSRange(location: 7, length: 1))
    string.addAttribute(.kern, value: 0, range: NSRange(location: 8, length: 1))
    string.addAttribute(.kern, value: 3, range: NSRange(location: 9, length: 1))
    string.addAttribute(.kern, value: 6, range: NSRange(location: 10, length: 1))
    string.addAttribute(.kern, value: 9, range: NSRange(location: 11, length: 1))
    string.addAttribute(.kern, value: 12, range: NSRange(location: 12, length: 1))

    label.attributedText = string
}
値には小数値を含んだNSNumberのインスタンスを指定します。
プラスの値を指定すれば間隔が伸び、マイナスの値を指定すれば縮みます。(デフォルトは0)
これを実行すると以下のようになります↓

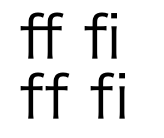
ligature
ligature は合字の制御を変更することができます。
合字とは、複数の文字を合成して一つの文字にしたものを言います。
(参考:合字 – Wikipedia)
func testLigature() {

    let text = "ff fi"
    let string = NSMutableAttributedString()

    string.append(NSAttributedString(string: "\(text)", attributes: [
        .ligature: 1
    ]))

    string.append(NSAttributedString(string: "\n"))

    string.append(NSAttributedString(string: "\(text)", attributes: [
        .ligature: 0
    ]))

    string.addAttributes([
        .font: UIFont(name: "HiraginoSans-W3", size: 30)!
    ], range: NSRange(0..<string.length))

    label.attributedText = string
}
値には整数値を含んだNSNumberのインスタンスを指定します。
1を指定した場合はデフォルトの合字処理を行い、0を指定した場合は合字を行いません。(デフォルトは1)
また、2はすべての合字を使用する設定だそうですが、iOSではサポートしていません。
これを実行すると以下のようになります↓
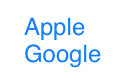
link
link はテキストにリンクを埋め込むのに使用します。
func testLink() {

    let string = NSMutableAttributedString()

    string.append(NSAttributedString(string: "Apple", attributes: [
        .link: URL(string: "https://www.apple.com/")!
    ]))

    string.append(NSAttributedString(string: "\n"))

    string.append(NSAttributedString(string: "Google", attributes: [
        .link: "https://www.google.com/"
    ]))

    textView.attributedText = string
}
値にはNSURL (URL) もしくは NSString (String) のインスタンスを指定します。
NSStringを指定しても、結果はNSURLに置き換えられます。
一応AppleとしてはNSURLでの指定が望ましいようです。(パフォーマンスの都合?)
これを実行すると以下のようになります↓
UITextViewの場合、UITextViewDelegateのtextView(_:shouldInteractWith:in:interaction:)メソッドを使って、リンクに対するタップ操作を検出することができます。
extension ViewController: UITextViewDelegate {

    func textView(_ textView: UITextView, shouldInteractWith URL: URL, in characterRange: NSRange, interaction: UITextItemInteraction) -> Bool {
        print(URL)
        return true
    }
}こちらもUITextViewのisSelectableをtrueに設定しておく必要があります。
デフォルトでtrueですけど。 (二度目)
obliqueness
obliqueness は文字を斜めにすることができます。
func testObliqueness() {

    let string = NSMutableAttributedString(string: "11111")
    string.addAttribute(.obliqueness, value: -2, range: NSRange(location: 0, length: 1))
    string.addAttribute(.obliqueness, value: -1, range: NSRange(location: 1, length: 1))
    string.addAttribute(.obliqueness, value: 0, range: NSRange(location: 2, length: 1))
    string.addAttribute(.obliqueness, value: 1, range: NSRange(location: 3, length: 1))
    string.addAttribute(.obliqueness, value: 2, range: NSRange(location: 4, length: 1))

    label.attributedText = string

    // Label will not change the own size for obliqueness, so add layout constraints
    label.textAlignment = .center
    label.widthAnchor.constraint(equalToConstant: 100).isActive = true
}
値には小数値を含んだNSNumberのインスタンスを指定します。
プラスの値を指定すれば時計回りに倒れ、マイナスの値を指定すれば反時計回りに倒れます。(デフォルトは0)
これを実行すると以下のようになります↓
paragraphStyle
paragraphStyle はこちらの記事でまとめています。
shadow
shadow はテキストに影を付けることができます。
func testShadow() {

    let shadow = NSShadow()
    shadow.shadowOffset = CGSize(width: 2, height: 2)
    shadow.shadowBlurRadius = 1.0
    shadow.shadowColor = UIColor.red

    let string = NSAttributedString(string: "SAMPLE", attributes: [
        .shadow: shadow
    ])

    label.attributedText = string
}値にはNSShadowのインスタンスを指定します。
これを実行すると以下のようになります↓
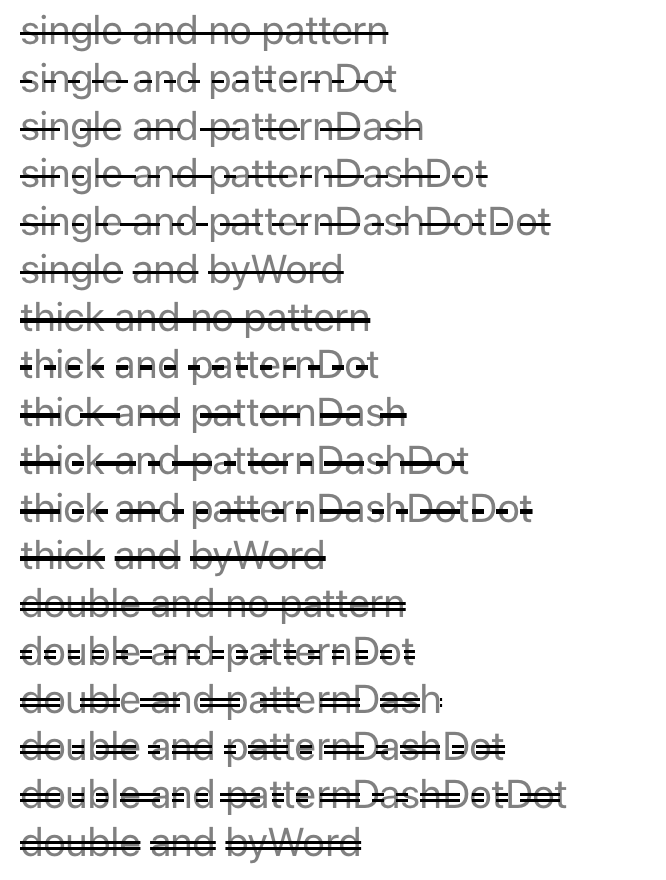
strikethroughStyle, strikethroughColor
strikethroughStyle と strikethroughColor は、テキストに取り消し線を引くのに使用します。
名前のとおり、それぞれ線のスタイルと色を指定します。
func testStrikethrough() {

    let string = NSMutableAttributedString()

    [NSUnderlineStyle.single, .thick, .double].forEach { style in
        [NSUnderlineStyle(rawValue: 0), .patternDot, .patternDash, .patternDashDot, .patternDashDotDot, .byWord].forEach { pattern in

            string.append(NSAttributedString(string: "\(style) and \(pattern)\n", attributes: [
                .strikethroughStyle: (style.rawValue | pattern.rawValue),
            ]))
        }
    }

    string.addAttributes([
        .font: UIFont.systemFont(ofSize: 20),
        .foregroundColor: UIColor.gray,
        .strikethroughColor: UIColor.black
    ], range: NSRange(0..<string.length))

    label.attributedText = string
}strikethroughStyleにはNSUnderlineStyleの値を、 strikethroughColorにはUIColorのインスタンスをそれぞれ指定します。
NSUnderlineStyleは一本線や二重線などの線種と、ソリッドやドットなどの線のパターンとが同列に定義されています。
そのため、二重線のドットパターンで引きたいといった場合、それぞれ2つのrawValueを論理和で合わせて指定する必要があります。
また、取り消し線を引かない場合、公式ドキュメントにはNSUnderlineStyleNoneを用いる旨が記載されていますが、どうやらSwiftでは定義されていないため、ここではNSUnderlineStyle(rawValue: 0) で代用しています。
strikethroughColorは未指定の場合、foregroundColorと同色になります。
それと最後に、ここではログ出力のため、NSUnderlineStyleのextensionを用意しています↓
どこかViewControllerクラスの外にコピペしてください。
extension NSUnderlineStyle: CustomStringConvertible {

    public var description: String {
        switch self {
            case .single: return "single"
            case .thick: return "thick"
            case .double: return "double"
            case .patternDot: return "patternDot"
            case .patternDash: return "patternDash"
            case .patternDashDot: return "patternDashDot"
            case .patternDashDotDot: return "patternDashDotDot"
            case .byWord: return "byWord"
            default: return "no pattern"
        }
    }
}
これを実行すると以下のようになります↓
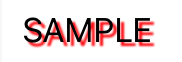
strokeWidth, strokeColor
strokeWidth と strokeColor は、文字の線の太さと色を設定することができます。
func testStroke() {

    let text = "SAMPLE"
    let string = NSMutableAttributedString()

    string.append(NSAttributedString(string: "\(text)\n", attributes: [
        .strokeWidth: 0,
    ]))

    string.append(NSAttributedString(string: "\(text)\n", attributes: [
        .strokeWidth: 5,
    ]))

    string.append(NSAttributedString(string: "\(text)\n", attributes: [
        .strokeWidth: -5,
    ]))

    string.addAttributes([
        .font: UIFont(name: "Futura-Medium", size: 40)!,
        .foregroundColor: UIColor.lightGray,
        .strokeColor: UIColor.orange,
    ], range: NSRange(0..<string.length))

    label.attributedText = string
}
strokeWidthの値には小数値を含んだNSNumberのインスタンスを、strokeColorはUIColorのインスタンスを指定します。
strokeWidthで指定した数値はフォントのポイントサイズに対するパーセンテージとして扱われます。
例として上記サンプルの場合、フォントサイズ40に対しstrokeWidth 5を指定していますから、40 * 0.05 = 2 となり、2ポイントの幅で線が描画されます。(↓のサンプル画像はRetinaディスプレイのMacbookでスクショしたものなので、倍の4pxになっています)
デフォルト値は0で、これは文字をFillのみでStrokeの描画を行わないことを意味します。
プラスの値を指定するとFillなしのStrokeによる描画、マイナスの値を指定するとFillとStrokeの両方による描画が行われます。
また、strokeColorを指定しない場合、線の色はforegroundColorの色と同じになります。
これを実行すると以下のようになります↓

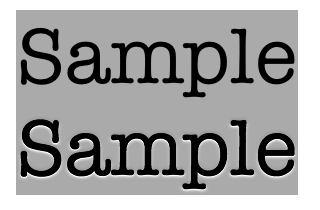
textEffect
textEffect はテキストにLetterpress Effectなど、特定の効果を与えることができます。
func testTextEffect() {

    let text = "Sample"
    let string = NSMutableAttributedString()

    string.append(NSAttributedString(string: "\(text)\n"))

    string.append(NSAttributedString(string: "\(text)\n", attributes: [
        .textEffect: NSAttributedString.TextEffectStyle.letterpressStyle
    ]))

    string.addAttributes([
        .font: UIFont(name: "AmericanTypewriter", size: 40)!,
        .backgroundColor: UIColor.lightGray,
    ], range: NSRange(0..<string.length))

    label.attributedText = string
}
値としてNSString (String) のインスタンスを指定します。
ひとつ「Letterpress Effect」という活版印刷の外観をもたせるための定義値がNSAttributedString.TextEffectStyle.letterpressStyle として用意されています。
ただし、このTextEffectStyleにはそれ以外の定義がなく、特にドキュメント等に記載もないため、他にどんな効果を与えることができるのかわかりません💧
これを実行すると以下のようになります↓
tracking
tracking はトラッキングを行うのに使用します。
上述したカーニングに似ていますが、カーニングが1文字ずつの間隔を調整する機能であるのに対し、トラッキングは指定した範囲のテキストの文字間隔を均等に調整する機能となっています。
このtrackingは、iOS14から使用できます。
そのため、iOS13より前のOSでトラッキングを行いたい場合、何かしらのワークアラウンドが必要になります。
こちらの記事でまとめていますので、よければ合わせてご参考にしてください。
func testTracking() {

    let string = NSAttributedString(string: "It's cooooool!!", attributes: [
        .tracking: 10
    ])

    label.attributedText = string
}
値には小数値を含んだNSNumberのインスタンスを指定します。
プラスの値を指定すれば間隔が伸び、マイナスの値を指定すれば縮みます。(デフォルトは0)
これを実行すると以下のようになります↓

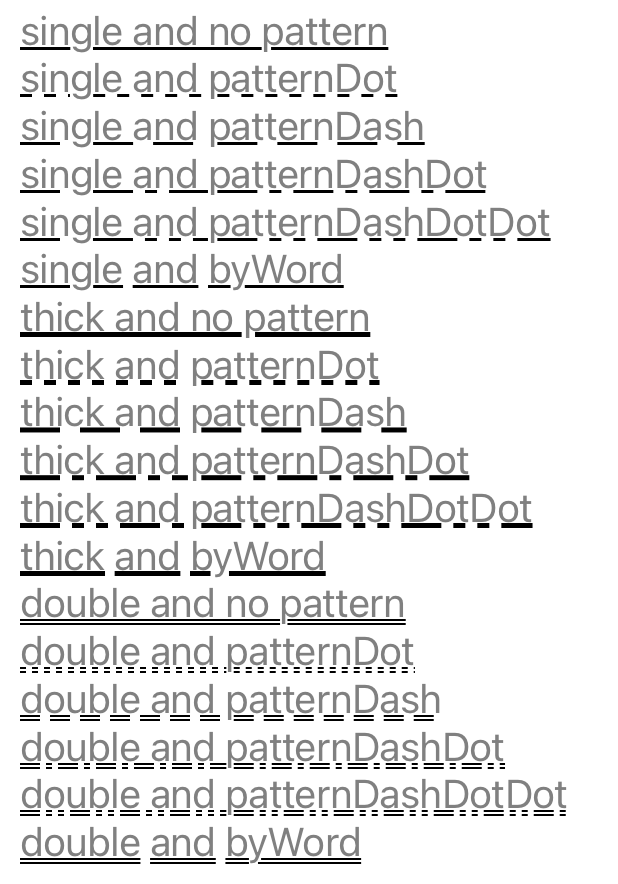
underlineStyle, underlineColor
underlineStyle と underlineColor は、テキストに下線を引くのに使用します。
名前のとおり、それぞれ線のスタイルと色を指定します。
func testUnderline() {

    let string = NSMutableAttributedString()

    [NSUnderlineStyle.single, .thick, .double].forEach { style in
        [NSUnderlineStyle(rawValue: 0), .patternDot, .patternDash, .patternDashDot, .patternDashDotDot, .byWord].forEach { pattern in

            string.append(NSAttributedString(string: "\(style) and \(pattern)\n", attributes: [
                .underlineStyle: (style.rawValue | pattern.rawValue),
            ]))
        }
    }

    string.addAttributes([
        .font: UIFont.systemFont(ofSize: 20),
        .foregroundColor: UIColor.gray,
        .underlineColor: UIColor.black
    ], range: NSRange(0..<string.length))

    // It doesn't seem to work "byWord" with UILabel for some reason
    //label.attributedText = string

    textView.attributedText = string
}
値として指定するものは、上述したstrikethroughStyleとstrikethroughColorと同じ、NSUnderlineStyleとUIColorになります。
使い方も同じです。
ですが、この下線の場合、なぜかNSUnderlineStyle.byWordがUILabelで効かないようです。(バグ?)
これを実行すると以下のようになります↓
verticalGlyphForm
verticalGlyphForm は各文字が縦向きか否かを設定することができます。
func testVerticalGlyphForm() {

    // It won't work with UILabel and UITextView in iOS
    let string = NSAttributedString(string: "SAMPLE", attributes: [
        .verticalGlyphForm: 1
    ])

    label.attributedText = string

    // Try in Core Text
    let size = CGSize(width: 80, height: 80)
    let imageView = UIImageView()
    view.addSubview(imageView)
    imageView.translatesAutoresizingMaskIntoConstraints = false
    imageView.leadingAnchor.constraint(equalTo: view.leadingAnchor, constant: 10).isActive = true
    imageView.topAnchor.constraint(equalTo: label.bottomAnchor, constant: 10).isActive = true
    imageView.widthAnchor.constraint(equalToConstant: size.width).isActive = true
    imageView.heightAnchor.constraint(equalToConstant: size.height).isActive = true
    imageView.backgroundColor = .lightGray

    imageView.image = UIGraphicsImageRenderer(size: size).image(actions: { context in

        context.cgContext.saveGState()
        context.cgContext.rotate(by: .pi / 2)
        context.cgContext.scaleBy(x: 1, y: -1)

        let setter = CTFramesetterCreateWithAttributedString(string)
        let path = CGPath(rect: CGRect(origin: .zero, size: size), transform: nil)
        let frame = CTFramesetterCreateFrame(setter, CFRange(), path, nil)

        CTFrameDraw(frame, context.cgContext)

        context.cgContext.restoreGState()
    })
}
値には整数値を含んだNSNumberのインスタンスを指定します。
0を指定すれば横向きのテキスト、1を指定すれば縦向きのテキストになります。(デフォルトは0。0か1なので、falseやtrueでの指定でもOK)
ただし、iOSでは常に横向きが使用され、0以外の値に意味を持ちません。
そこで試しにCore Textを使って書いてみたのがUIImageViewを作って何某かしている部分になります。
これを実行すると以下のようになります↓
Core Textでは一応縦向きに描画することができました。
ちなみに、描画処理の中でrotateやscaleByなどをしていますが、もしこれがないと以下のような描画結果になります↓
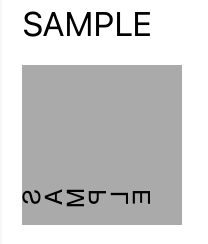
verticalGlyphFormは文字列ではなく各文字の向きを変えるものなので、縦書きになるかと思いきや、横書きのまま文字だけがくるっと回転している結果になります。
そして文字が上下反転しているのは、CGContextの座標系 (ULO, Upper Left Origin) とCore Textの座標系 (Lower Left Origin) の違いによるものです。
この状態から、文字列を縦向きにするためにrotateを、座標系を変換して反転を戻すためにscaleByを行っています。
Core Textについては、こちらのサイト様の記事を参考にさせていただきました 🙇♂️
Core Text で縦書き – 錯綜
writingDirection
writingDirection は双方向テキストの制御を変更することができます。
双方向テキストとは、日本語や英語などの左から右へ書くテキストと、アラビア語やヘブライ語などの右から左へ書くテキストが混在したテキストのことを言います。
(参考:双方向テキスト – Wikipedia)
例えば、日本語の文章の途中にアラビア語が含まれるようなものがあった場合、デフォルトではUnicode Standard Annex #9で定義されているアルゴリズムに沿って文字の並びを決定します。
「アラビア語で『こんにちは』は『أهلا』と言います。」という文章があった場合、アラビア文字の部分だけ右から左へと並んでいますが、このwritingDirectionではそのアルゴリズムを上書きして文字の並びを変更することが可能です。
func testWritingDirection() {

    let string = NSMutableAttributedString()
    let arabicHello = "أهلا"
    let englishHello = "Hello"

    [NSWritingDirection.natural, .leftToRight, .rightToLeft].forEach { direction in
        [NSWritingDirectionFormatType.embedding, .override].forEach { type in

            string.append(NSAttributedString(string: """
                \(direction) + \(type)
                😃 ”\(arabicHello)" means "\(englishHello)" in English.


                """, attributes: [
                    .writingDirection: [direction.rawValue | type.rawValue]
                ]))
        }
    }

    label.attributedText = string
}
値にはNSArray (Array) のインスタンスを指定します。
Arrayの各要素は整数型の数値を含むNSNumberのインスタンスで、各数値はテキストの方向を示す NSWritingDirection と フォーマット種別を示す NSWritingDirectionFormatType の値 (rawValue)を論理和で組み合わせて指定します。
また、ここでもログ出力のため、それぞれ以下のようなextensionを設けています↓
extension NSWritingDirection: CustomStringConvertible {

    public var description: String {
        switch self {
            case .natural: return "natural"
            case .leftToRight: return "leftToRight"
            case .rightToLeft: return "rightToLeft"
        }
    }
}

extension NSWritingDirectionFormatType: CustomStringConvertible {

    public var description: String {
        switch self {
            case .embedding: return "embedding"
            case .override: return "override"
        }
    }
}
これを実行すると以下のようになります↓
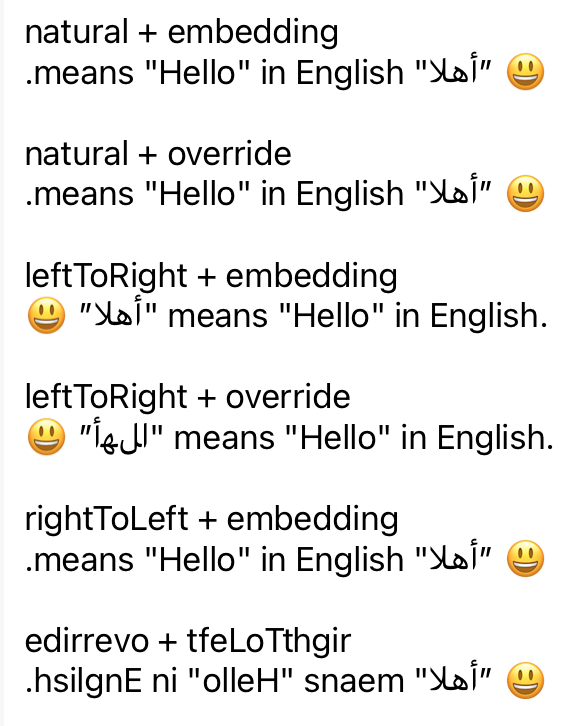
NSWritingDirection.naturalが指定される (NSWritingDirectionサイドのデフォルト値)と、文字列が走査され、最初に[左→右]言語の文字が見つかれば左→右書きとなり、[右→左]言語の文字が見つかれば右→左書きとなります。 (絵文字や記号等を除く。動作の詳細は上記UAX #9のサイトをご参照ください)
そのため、ほぼ英字の文章ですが、先頭がアラビア文字のため右→左書きとなっており、絵文字が末尾に、ピリオドが先頭に来ています。
naturalの代わりにleftToRightまたはrightToLeftを指定すると、この処理を無視して左→右書きまたは右→左書きへと意図した方向に変更することができます。
また、NSWritingDirectionFormatTypeにはembedding (NSWritingDirectionFormatTypeサイドのデフォルト値) とoverrideの2つが定義されていますが、前者が「ある方向の文章中に別方向の文字を埋め込むよ」という指定を意味し、後者が「強制的にこっちの方向にしてね」という指定を意味します。
そのため、embeddingが指定された文章では、全体の方向は変更されていても、その中のブロック (英字が連なる部分、またはアラビア文字が連なる部分) の方向は変わっていません。
一方で、overrideが指定された文章では、昔の日本語のように文字レベルで方向が変更されています。
ちなみに、直接文字列中にUAX #9で定義されたUnicodeの制御文字を打ち込んでも同じ結果が得られます↓
func testWritingDirection2() {

    let arabicHello = "أهلا"
    let englishHello = "Hello"
    let LRE = "\u{202A}" // Left to Right Embedding
    let RLE = "\u{202B}" // Right to Left Embedding
    let LRO = "\u{202D}" // Left to Right Override
    let RLO = "\u{202E}" // Right to Left Override
    let PDF = "\u{202C}" // Pop Directional Formatting

    let text = """
        \(LRE)😃 ”\(RLE)\(arabicHello)\(PDF)" means "\(englishHello)" in English.\(PDF)
        \(RLO)😃 ”\(LRO)\(arabicHello)\(PDF)" means "\(englishHello)" in English.\(PDF)
        """

    label.text = text
}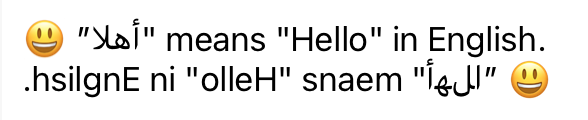
ここで登場するPDFというのは、LREやRLEを入れ子で指定した時の、直近の指示を終了させる役割を持ちます。(HTMLでいう終了タグみたいな役割)
writingDirectionで指定する値はArrayとなっており、以下の公式ドキュメントにもあるように
The value of this attribute is an
writingDirection – Apple Developer DocumentationNSArrayobject containingNSNumberobjects representing the nested levels of writing direction overrides, in order from outermost to innermost.
「Arrayの各値はネストされたレベルの一番外側から一番内側を順に表す」となっているので、このPDFによる入れ子の指示ができるものと思ったのですが、私が試した限りではArrayの二つ目以降の要素の使い方がいまいちよくわかりませんでした💦
文字列中に制御コードを入れるとそちらが優先されちゃうし、かと言ってじゃあ何を持ってテキストが入れ子となってArrayの各要素が割り当てられるのかがわからないしで、なんとも…
UITextView.typingAttributesに設定してあれこれ入力してもみたけど…
なので、もしご存じの方がいらっしゃいましたら、Twitterもしくはお問い合わせフォームなどからこっそり教えていただけると助かります🙏
参考リンク
・NSAttributedString.Key – Apple Developer Documentation
https://developer.apple.com/documentation/foundation/nsattributedstring/key
おわりに
いかがでしたでしょうか?
個人的に、これまではいくつかの限られた属性しか使う機会がほとんどなかったのですが、まとめてみると結構柔軟にテキストを装飾することが可能で、これならある程度のものならデザイナーさんに画像素材として作成してもらうまでもなくプログラムで対応することもできそうだな、なんてことを思いました。
この記事がどなたかの助けとなりましたら幸いです。
では。